

Living Failures |
|||
|---|---|---|---|
 |
|||
| General Info | |||
 |
 |
Location | Drops |
| 20,646 | 22,000 | Research Hall | Astral Clocktower Key |
| Defenses | |||
 |
 |
 |
-- |
| 239 | 273 | 102 | -- |
 |
 |
 |
 |
| 171 | 256 | 92 | 71 |
 |
 |
 |
 |
| 250 | 180 | No | Yes |
Living Failures (失敗作たち Shippai saku tachi lit. "Failed Creations") is a Boss in Bloodborne. This was added with The Old Hunters DLC.
Living Failures General Information
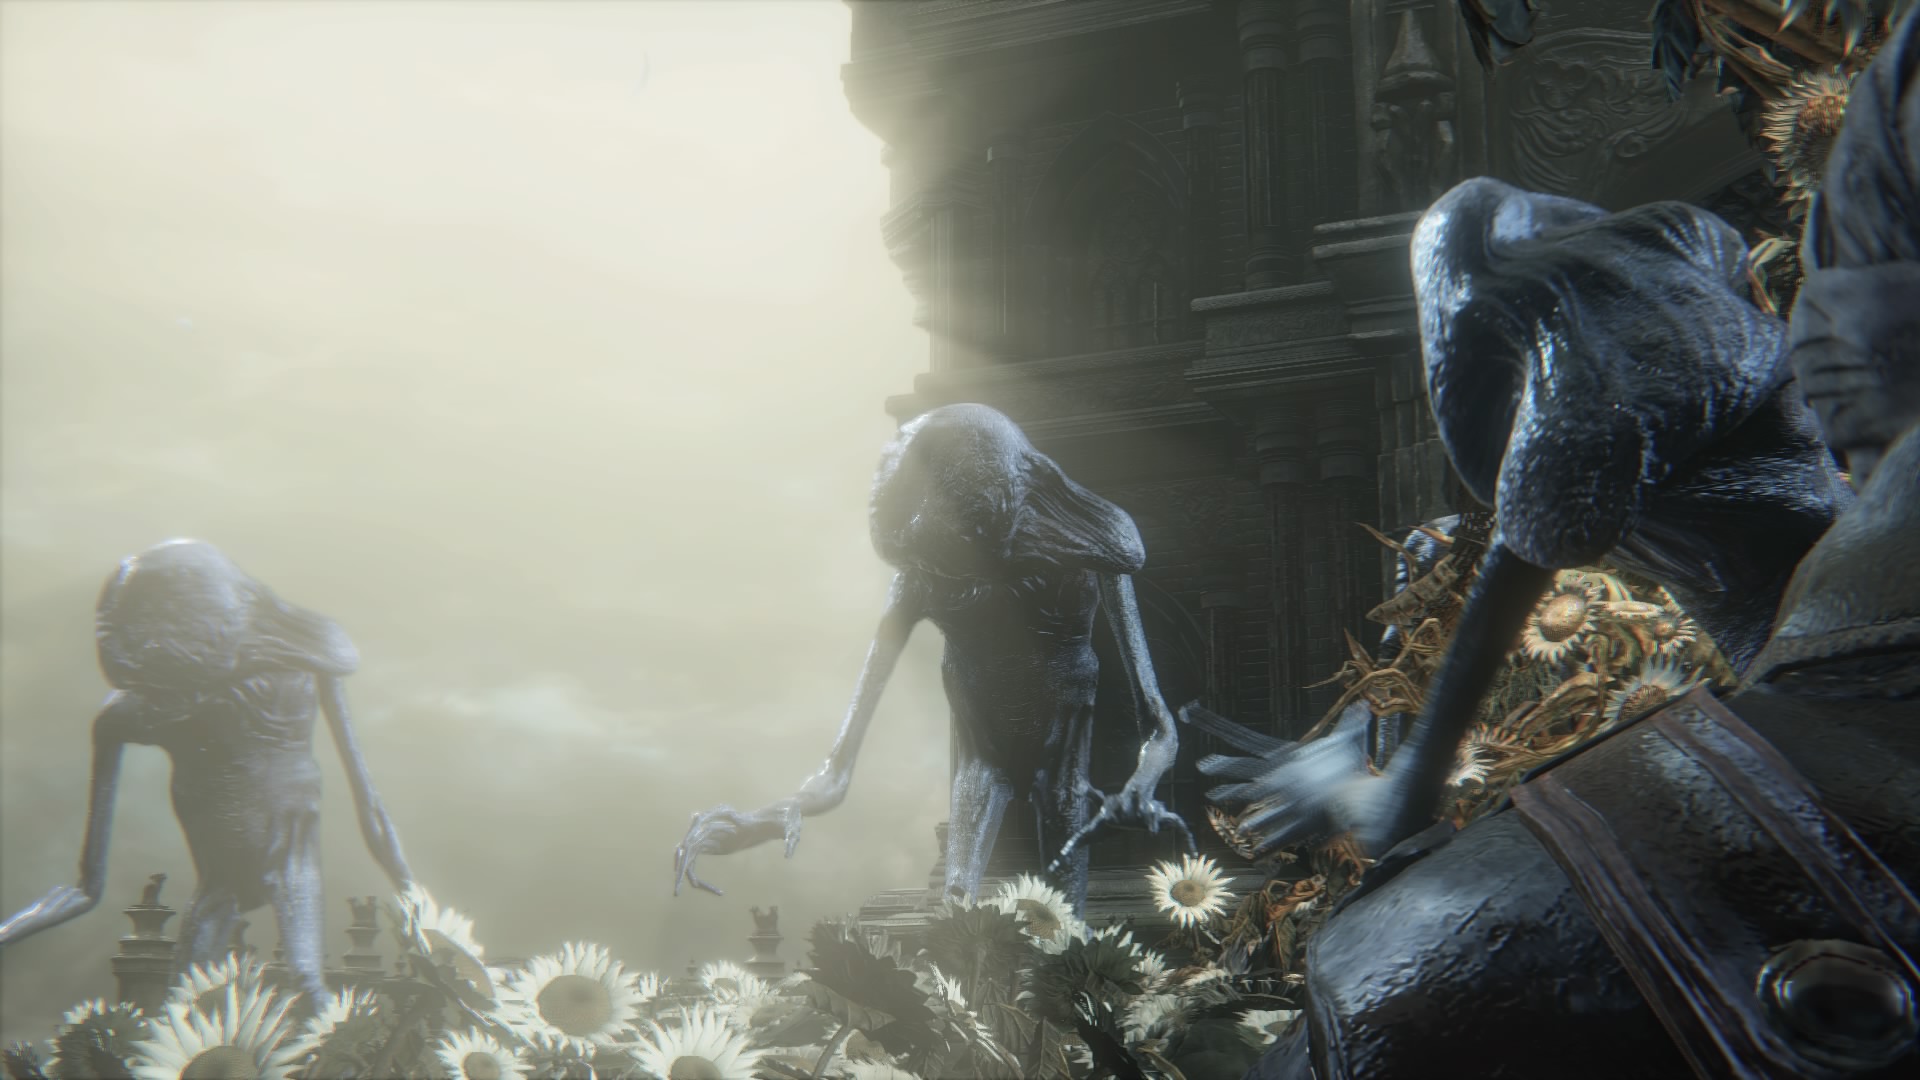
The Living Failures are massive, slender, alien-like creatures. They are light bluish in color and their arms are curiously elastic. Although having a humanoid stature, they are severely deformed. Their heads are extremely large and misshaped, appearing to fold over itself and connect to its shoulders. It lacks any recognizable facial features. As they cast Arcane attacks, they get two glowing dot eyes, however these float in front of their face and are not physically connected to their head. Their arms are extremely long, almost being able to touch the floor in a standing position. They have large hands, each with 6 fingers. Altogether, it is approximately 2.5 times as taller than the Hunter. They strongly resemble the Celestial Emissary boss found in the Orphanage as well as the Enlarged Head Patients found throughout the Research Hall.
In order to get to the Living Failures, the Hunter must go through the Research Hall and rotate the stairs to gain access to the door that leads to Lumenwood Gardens.
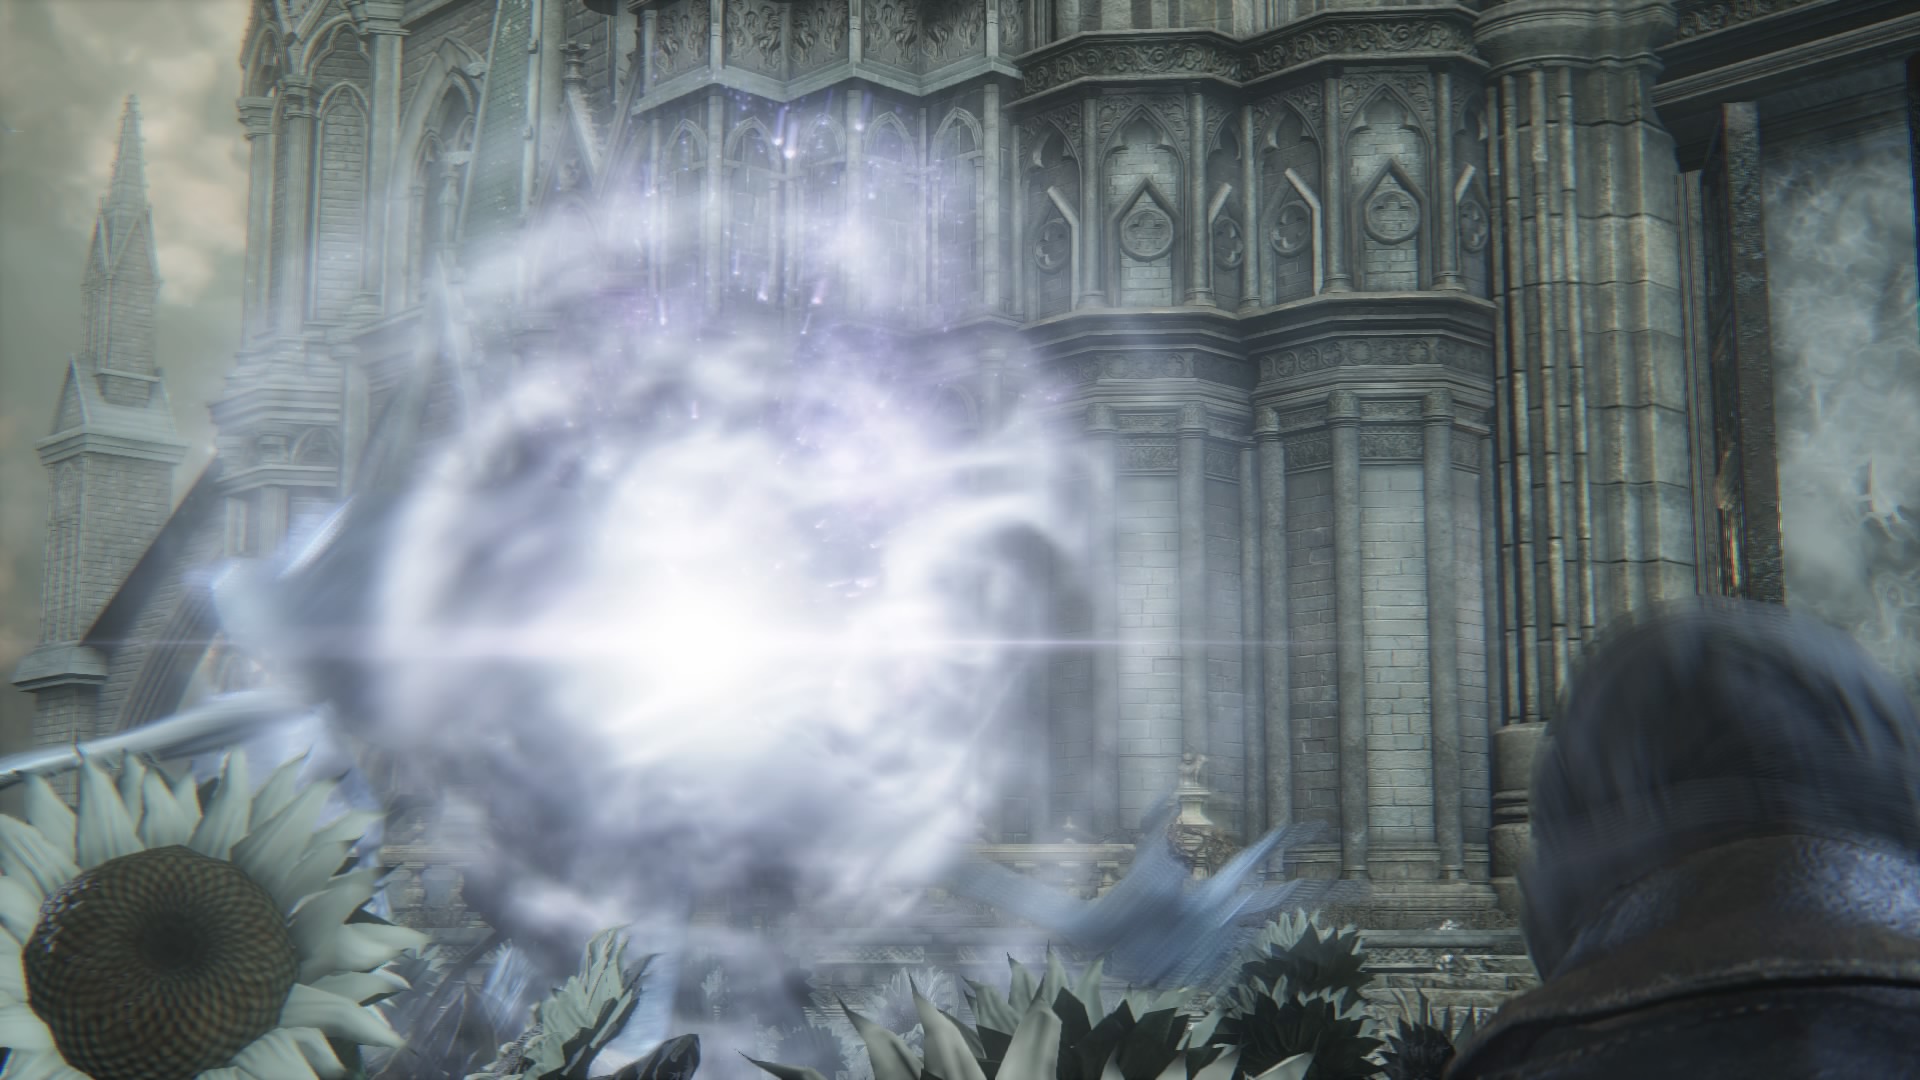
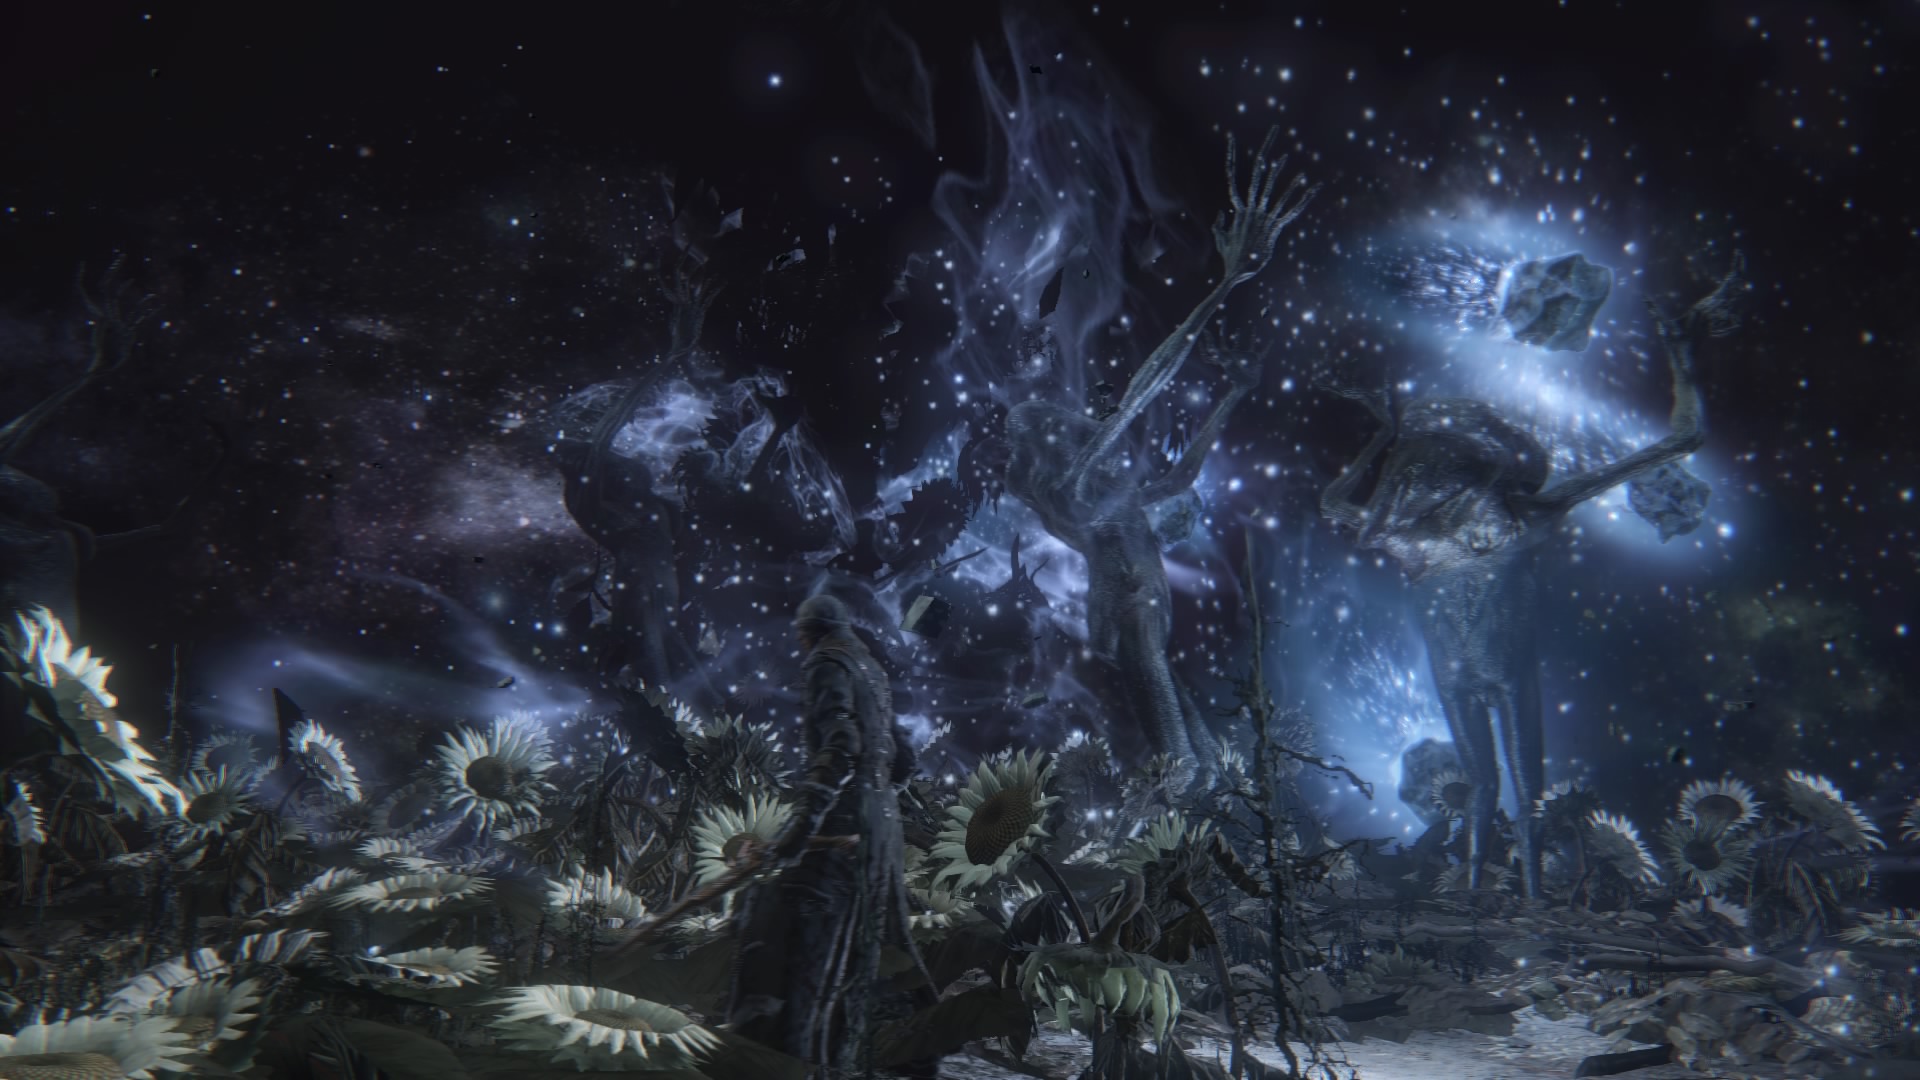
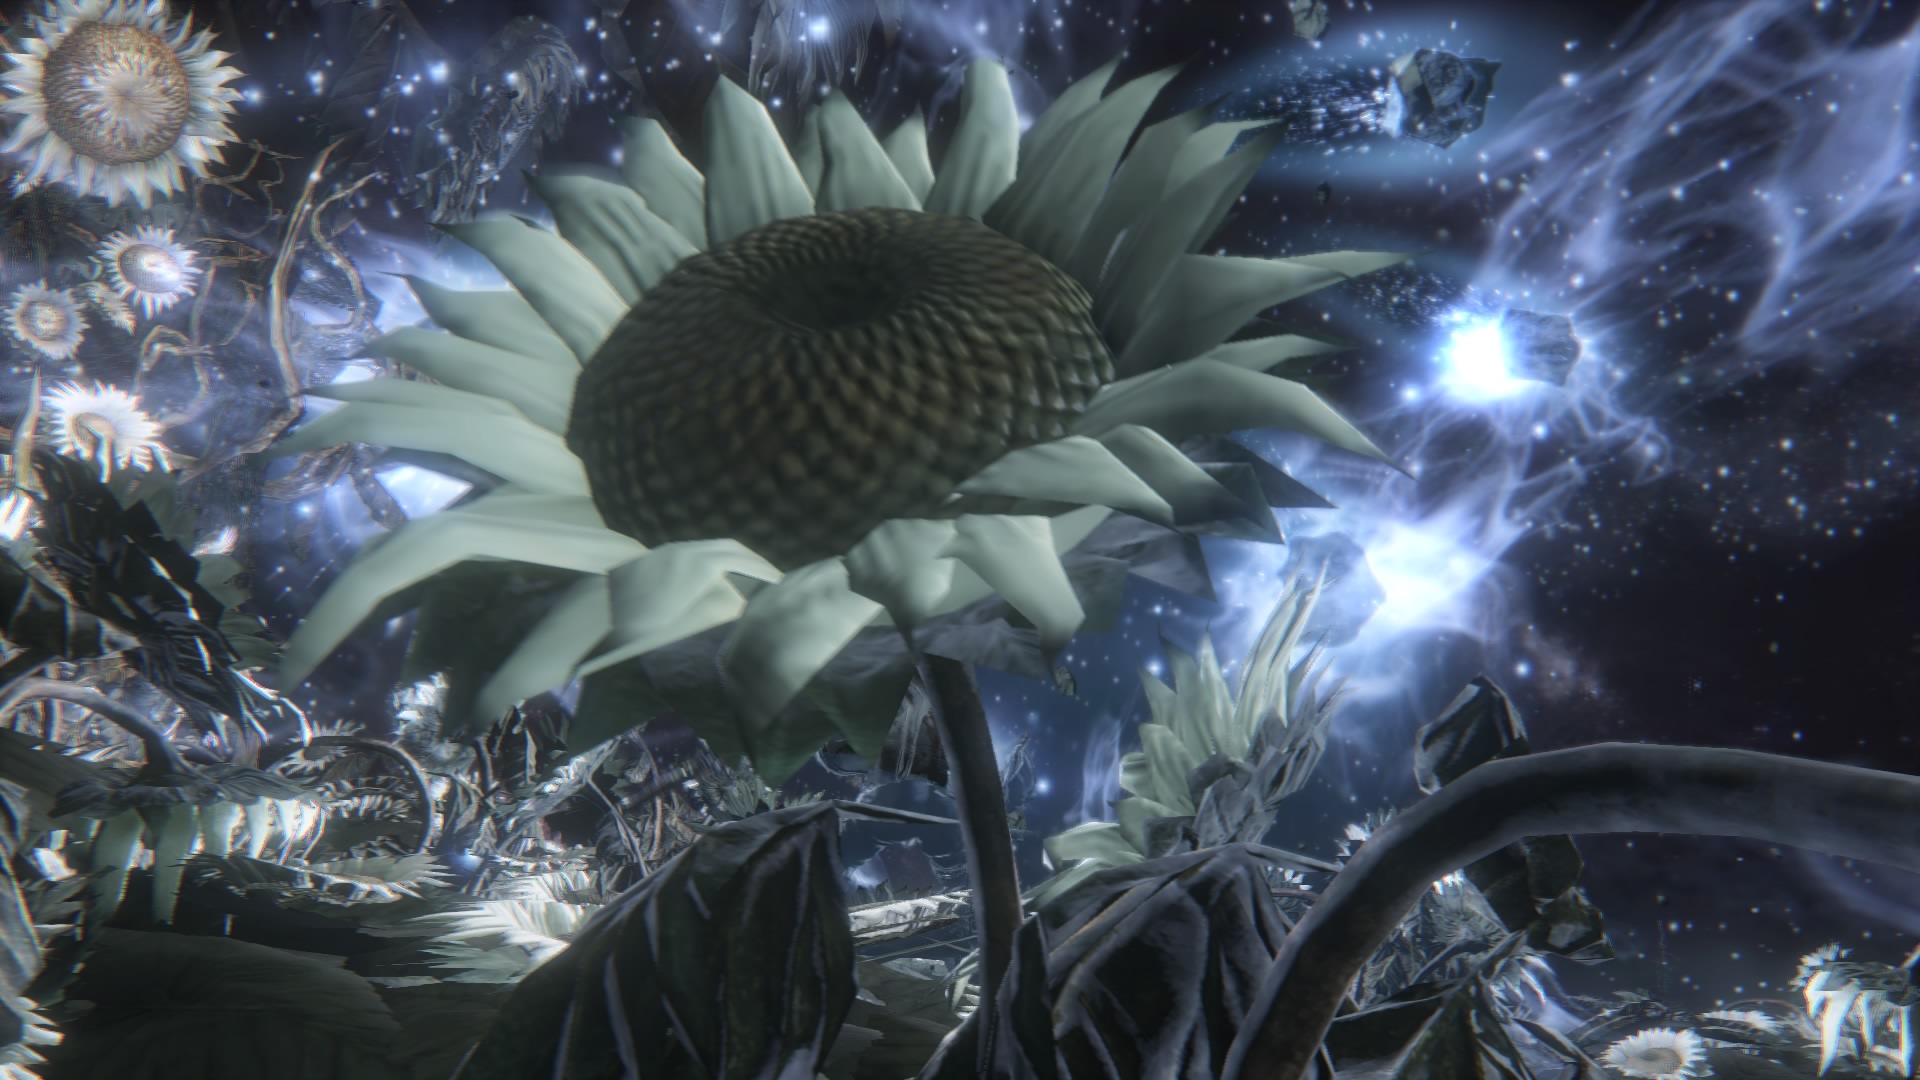
Lumenwood Gardens, the boss arena, is shaped like an octagon with a large lumenflower tree in the middle. This tree is useful for blocking the projectiles that the boss uses.
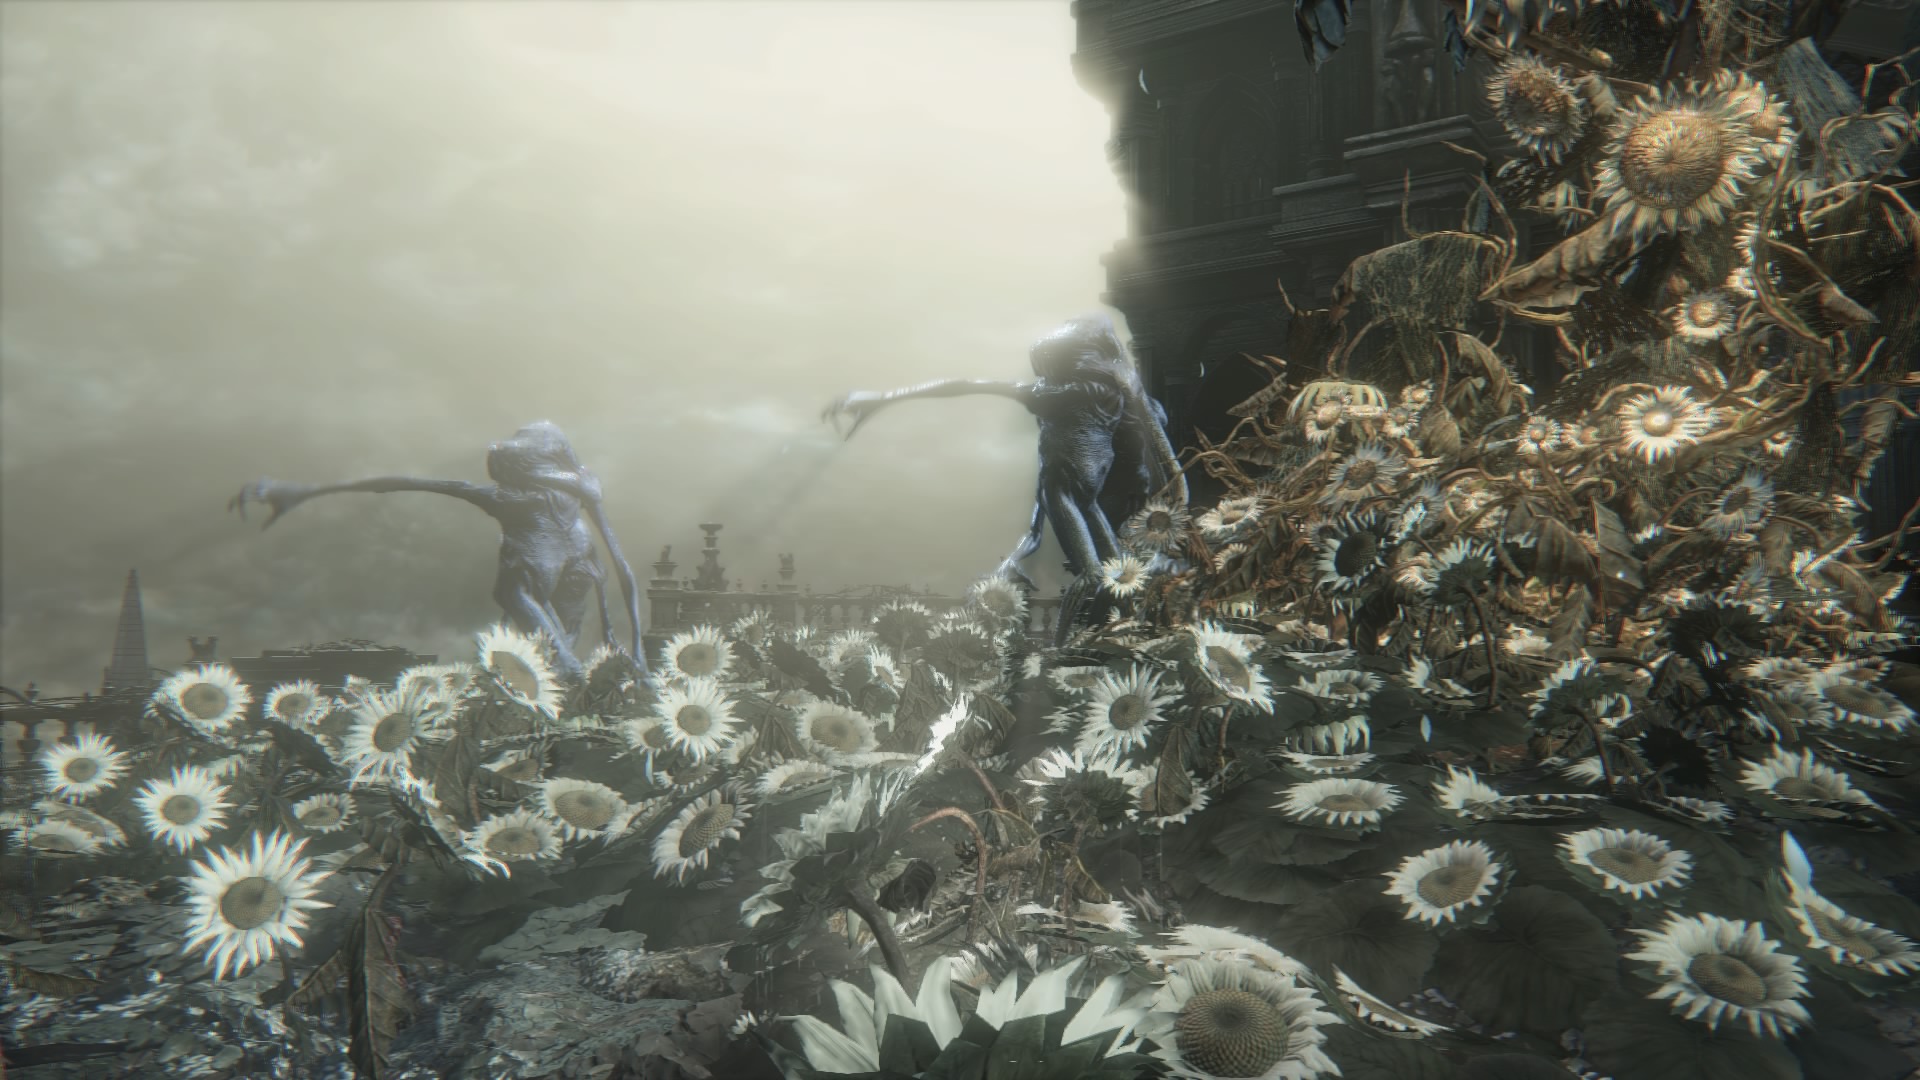
When first entering the arena, only one Living Failure will be present. After a few seconds, another one will appear. This pattern will continue until a maximum of 4 are in the arena. When one dies, another will spawn to take its place.
Although there are four Living Failure at any given time, they all draw from the same health pool. However, if an individual is damaged enough it will die.
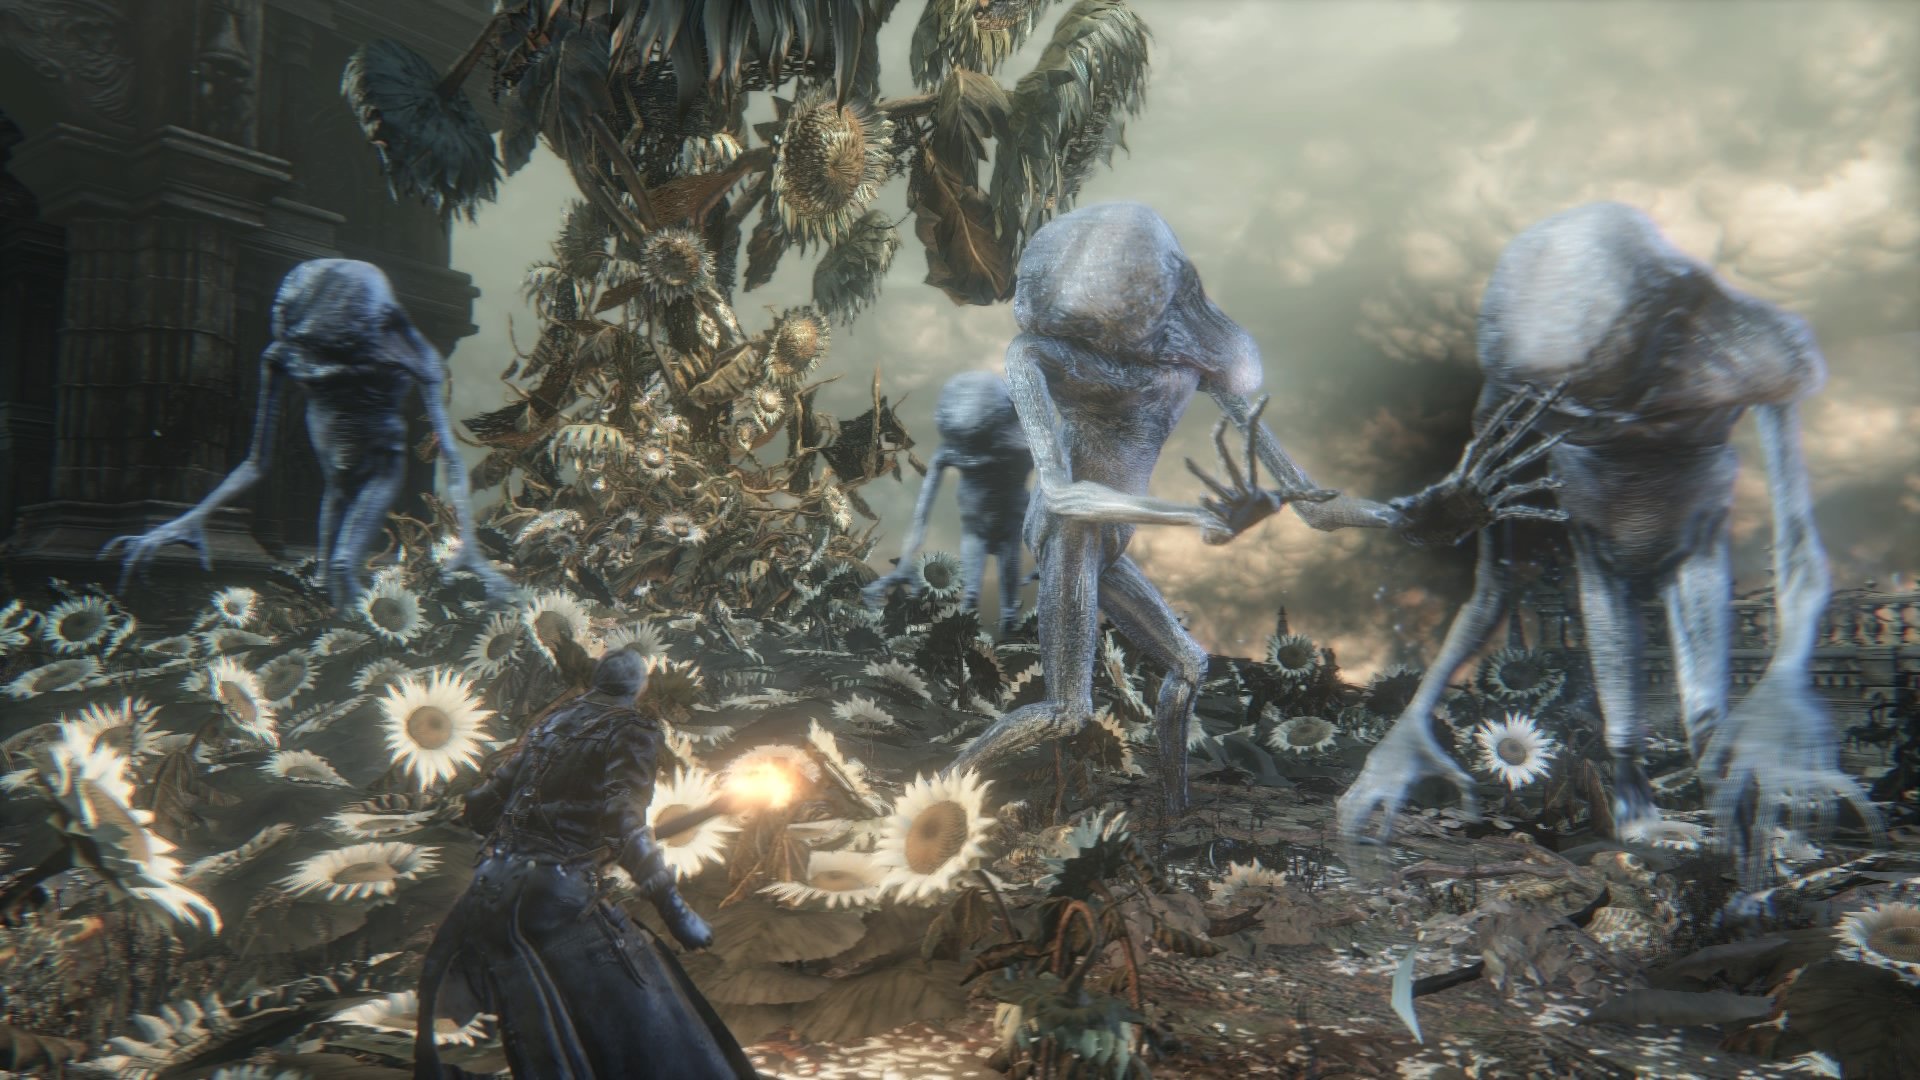
- Living Failures self-organize, always some Failures will employ melee attacks, while others summon Arcane volleys.
- The melee ones will usually follow you around, though allowing them to attack and dodging out of the way will slow them down greatly.
- The casters can perform 2 different arcane attacks: Magic Orb and Homing Bolts.
- The casters only perform melee if the player is in close proximity. They can either use Headbutts, flailing their arms (twice) or slams.
- During phase 2 slams can be accompanied by an arcane explosion.
This boss has two phases:
- Phase 1:
- The Living Failures will start spawning one by one as the fight progresses, until all four are present.
- They will use abilities depending on their type (melee or caster), targeting the player.
- Phase 2:
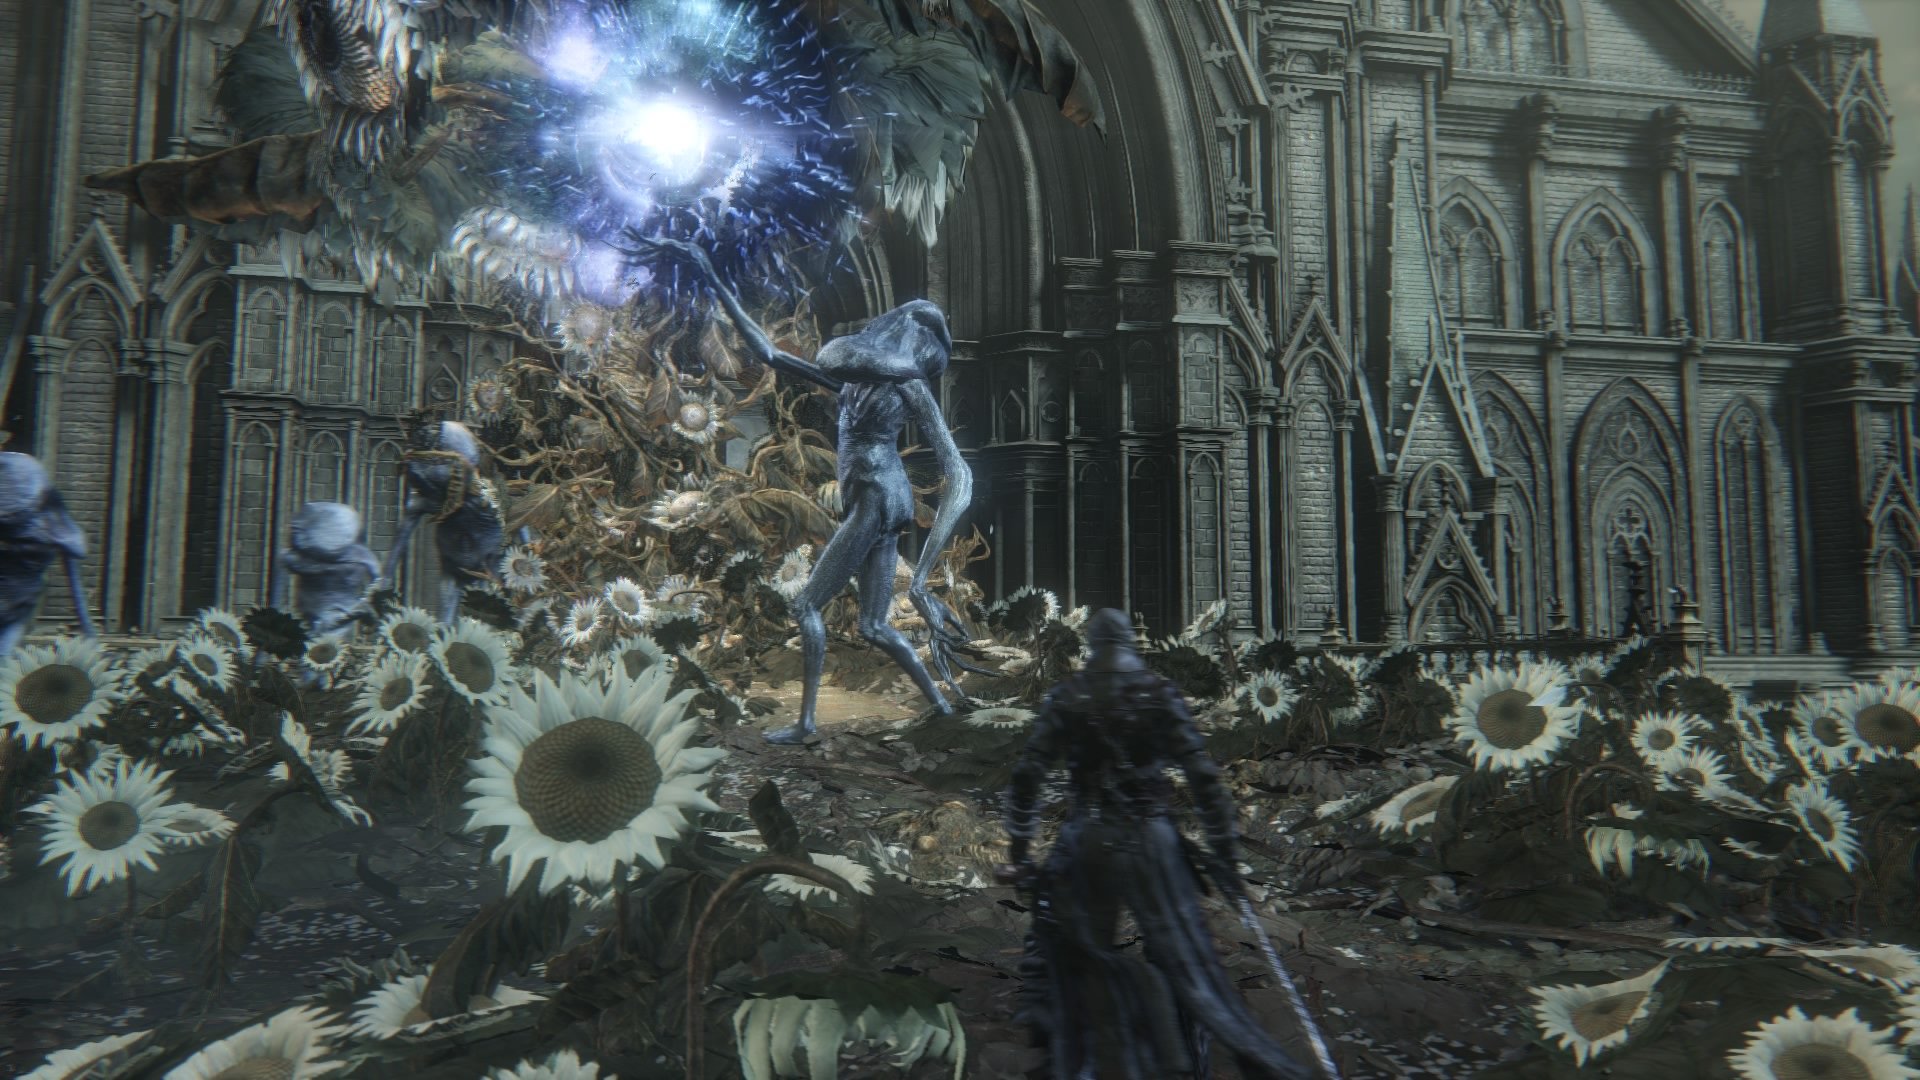
- When the boss is at about 60% health, phase two will start.
- All of the Living Failures will stop and raise their hands toward the sky, using the Meteor Storm ability.
- The room will get dark and the sky will turn into the cosmos, after which blue meteors will rain down on the field.
- The Failures will not retaliate when attacked during this. (Stunning one without killing it may take it out of the "cast")
- Killing a Living Failure during this attack will still make a new one spawn, which will attack you normally.
- If obtained earlier, the Loch Shield is especially helpful during this phase, as it boasts a high arcane resistance. When equipped and blocking, the player can survive multiple meteor strikes with little damage taken, as long as the player has enough stamina.
- The boss will now have access to this attack and can perform it any time during the remainder of the fight.
- The attack does not require any specific amount of Living Failures, as long as one is alive the boss can perform this attack.
You can summon Yamamura for this fight. (Must be killed in his cell to do this)
Locations
- Research Hall: Lumenwood Garden
Drops
Strategy
- To keep the battle simple, focus on one individual at a time. Killing it will cause it respawn elsewhere, giving you a few precious moments having to deal with only 3 of them.
- Meteors can be easily avoided. If the you run counter-clockwise, they will be safe. Likewise, using the Lumenwood tree as cover will protect you from any damage. If both of these cannot be done, the Loch Shield can be used to absorb a large amount of the damage, giving you the opportunity to relocate to a safer position. Another easy way to avoid the meteors is to run into the doorway of the opposite side of where you enter the boss room. It's very difficult for them to hit you there.
- Always try to attack whichever Failure is the most isolated. Usually, the 2 melee Failures will follow you while the casters keep their distance. This makes the casters easier targets, especially since the time it takes for them to channel their spells leave them defenseless.
- Summoning Yamamura can make the fight a whole lot more manageable, since he can distract, and counter the failures. You can both use him to distract two or more of the failures, so you only have to take care of two of them, or you can have him distract them, while you sneak up behind them, and backstab+visceral them (Keep in mind, that while Yamamura can heal, and take a bunch of damage, leaving him to three or four of the failures alone for too long, will result in him dying). If you treat Yamamura with somewhat care, he has enough health and healing, to last the whole battle. So make sure to check out how to unlock him, it's quite easy!
- Avoid being surrounded at all costs. Try to keep in mind the relative position of each Failure, as it is easy to lose track. This leads to occasions where you would dodge away from one's attack, directly into another that was out of sight.
- The meteor spell that they cast always comes from the same location. This location is from the sky, past the balcony at the far end of the arena when looking from the entrance and to the right.
- The meteor attack presents a very large opening for backstabs, but be cautious whether or not you'll be safe from the meteors. However, the visceral animation grants a brief window of invincibility, so use that to your advantage.
- Other opportunities for backstabs are after they perform a Headbutt, during their spawn animation, and when the casters channel their arcane attacks.
- The sides of a Failure are a good place to attack, as you will be safe from their Headbutt and Slams. The back would be optimal, but it is extremely difficult to stick there, especially while playing solo. Keep in mind that you can still be hit by Flailing and Swipes.
- Using a heavy, hard hitting weapon like Kirkhammer or Whirligig Saw and using a hit 'n' run tactic by using the running R2 attack is very effective. It staggers the Failures and interrupts their attacks. This can also be accomplished by performing a jumping attack with a large weapon. If you see 3-4 Failures close to each other, you can fairly safely hit them all and do massive damage to the shared health bar.
- They are weak to Bolt, so equip an appropriate Gem Stone or have Bolt Paper ready.
- Because of this, the Tonitrus is very effective in this fight.
- Rule of thumb for counter shotting is that when they swing their arms left (your right) they always swing them back right (your left). That second swing is very easy to parry.
- After killing a Failure, while the death animation is still playing you can usually get a single attack in, which is helpful if you've been attacked but can still recover health.
- The Shaman Bone causes the Living Failure to turn against one of the others for a duration of time. This allows you to reposition or heal as 2 out of 4 of them will be occupied.
- Triggering a death animation on one of the Living Failures immediately triggers the spawn animation for another somewhere in the arena. The animation has the Living Failure begin in a fetal position and slowly raises to a stand. During this animation, it has no means to defend itself allowing for easy damage or backstabbing.
- Using the upgraded Whirligig Saw's L2 during this animation will almost always guarantee a kill before the living failure can attack. If done early enough, this will prevent more than 2 Living Failures from spawning, and you'll only have to worry if the second one tries to engage in physical attacks.
- The Living Failures have a specific spawning rotation, at four different corners of the arena, in a counter-clockwise order, starting with the left corner near the door. (from where you enter)
- If you are quick enough and have enough damage it's possible to simply camp a single spawn point without allowing the boss to do anything at all, killing the new spawn repeatedly.
- Rapid Poison:
- Rapid poison is a major weakness of this boss but it works weirdly. It seems that when Rapid Poison triggers it drains HP from the common health pool and not from any individual Failure. So basically Rapid Poison can't kill any single Failure but can deal the final blow to the whole boss fight, killing all Failures.
- If a player doesn't kill any individual Failure, they can't enter the second phase and summon meteors. So with Rapid Poison via top tier Dirty Gems players can kill the boss without ever seeing the phase two. Best dirty gems can be farmed from Wrathful Stingers in the chalice dungeons.It takes around 7-8 hits with a weapon that has Dirty Bloodgems on it to cause Rapid Poison but these hits can be done to any Failure, not just one. For example 6 hits to melee Failure and then hitting a magic caster triggers the Rapid Poison.
Videos
Gallery

| Attack Name | Attack Description & Counter |
|---|---|
| Swipes | Heavily telegraphed arms swipes. Usually done in two series of swipes. Remember to dodge both of them. Can follow up with a double hands slam. |
| Flailing | The Failure will flail it's arms attacking around them. Can be done twice if player is close enough. (Imagine that you're pretending that your arms are entirely numb and you try to turn your torso from right to left and back. That is basically what happens here) |
| Headbutt | The Failure slams its head directly down in front of it. Close range attack. Deals heavy damage. Subtlety telegraphed, be ready to dodge at a moment's notice. |
| Frontal Slam | Similar to the Headbutt, except that both arms also slam down. After meteor rain they can follow up with an explosion around the arms (similar to a Magic Orb hitting a surface). This has a very long recovery time, leaving it open to backstabs. |
| Astral Orb | Takes time to cast and moves slowly in a very low arc. (almost a straight line) Only real danger is that it explodes upon impact when it hits ground or walls. |
| Cosmic Missiles | Failure cast a floating orb over its head that shoots 6 slowly moving homing bolts. Player can use the giant sunflower to block them or just dodge them all. Can be interrupted by staggering or backstabbing while the orb is forming. |
| Meteor Swarm | All Failures stop, lift their hands, transform the sky to look like space and summon a rain of meteors. They come only from one direction so spot them and get behind the giant sunflower. Failures won't attack you. Running in anti-clockwise circles around the arena works just as well to escape the meteors. Additionally, hugging the Doorway opposite to the one you entered through will ensure that none of the meteors hit you. |
Notes & Trivia
- The theme of Living Failure loosely resembles Seath's theme from King's Field, as well as Mars, Bringer of War by Gustav Holst.
- Killing the boss at the very second a Living Failure is spawning can sometimes leave that Failure alive to walk around, attack and perform all of the boss's abilities, even the Meteor Storm. (it will have a set amount of health, though not visible when damaging it)
- Killing a Failure while it is casting arcane missiles can leave a black blotch in the sky with no projectiles coming from it.
- Their meteors (or comets, as they look like they're made of ice) can produce very tiny snowflake crystals. Extreme close-up required.
 Anonymous
PSA: If you're having trouble with the meteor shower, just stand behind the flower column in the opposite direction of the meteors. The meteors only come from one direction.
- Anonymous
- Anonymous
That’s what my parents called me after I didn’t link the first flame
- Anonymous
A cool fight honestly. At first it seems stupid, weird, clunky (and it is!) even the music is kinda meh, also the name doesn't help at all. But then those rejects suddenly stand up, raise hands and... Magic occurs. Even the music becomes screaming and epic. Truly a moment of cosmic clarity among their sad lifes, when I saw it the first time, I was awestruck
- Anonymous
It's literally unbelievable how bad every aspect of this boss fight is, from the hit-boxes to their inflated hp, putting this in the Old Hunters DLC would be like if Michelangelo sculpted David and then smeared **** all over him.
- Anonymous
- Anonymous
- Anonymous
Not particularly difficult, just extremely boring and tedious, thankfully Maria makes up for it right after
- Anonymous
- Anonymous
- Anonymous
They are silly little fellas. Ain’t a bad boss but kinda tedious. Of course the third best ost in the DLC is dropped on these guys.
- Anonymous
Easy for a melee build. Just run around and find an isolated alien. Hit & run. You will learn quickly when there is an opening for a charged attack so use it. Sometimes you can get lucky and hit more than 1 guy. Once they start casting the meteor just start dodging or look at the sky and find out which direction it comes from & hide behind the pillar in the center.
- Anonymous
- Anonymous
Got lucky here, one just kept chasing Yamamura around and the other just kept respawning in the same place when i killed it
- Anonymous
Boom Hammer, when ignited, deals heavy AOE damage on impact.
While some of the creatures cast arcane spells, others try to swarm you and can be easily baited into grouping up using the tree in the center.
It is possible to deal triple damage to the healthbar of the boss with a single hit, if player manages to time and space a good charge attack with R2 (again, using ignited mode for Boom Hammer as an example)
- Anonymous
Hard fight as i Found. Had 1/8 Health left and all potions used.
- Anonymous
All Visceral Attack runes are bugged on them, not just Echo Gain runes. Base Blood Rapture will heal 800+ health, +2 Odeon Writhe gives over 7 Blood Bullets (never actually saw how many on account of getting so many back)
- Anonymous
By no means the hardest fight I encountered in Bloodborne. By all means the most bullshit fight I've encountered in any video game. Half my hits miss, despite being target locked against a 10 foot monster. The whole fight felt buggy and silly and I can't even pin down why. even though I only died to the boss 3 times, all three times I thought what the hell. I died to ludwig probably a hundred times and never once thought it was just garbage BS. I'm glad it's over because it single handedly hindered my opinion of the whole game. I hadn't really found any dislikes until this one and it feels huge to me. very disappointed. They Should change the name to design failure. well it's done now, but I no longer see myself doing another playthrough.
- Anonymous
I find it weird that the living failures are more powerful than the new emissaries
- Anonymous
Clearly a reference to the soulsborne community.
Grateful to be part of
- Anonymous
FromSoft fr gonna drop the hardest OST in a video game ever on "Living Failures"
- Anonymous
- Anonymous
Doesn't matter how many times I've beat this game, I will never have even a single bit of fun when I fight this thing
I walked in and the npc and i got stuck in the door lmao what a waste
- Anonymous
- Anonymous
- Anonymous
- Anonymous
I just came here to figure out why they are called Living Failures.
- Anonymous
People been saying they're super easy, but holy hell these guys are a nightmare to fight against while using arcane builds
- Anonymous
My very first playthrough of BB: died 0 times to:
Cleric Beast, BSB, Amelia, Amygdala, Logarius, Paarl (with npc summon but still), Micolash, One Reborn
Died 1 to: this ****ing thing (+ papa guacamole and shadows)
- Anonymous
Calling this boss "literally me": boring, overused, unfunny, not even true (you are an amazing person who deserves to be loved)
Calling this boss "the four kings on meth": fresh, new, funny, actually true
- Anonymous
I know this is considered an objectively easy boss, but I always have trouble with these.
- Anonymous
just a fair warning, if you're going to deal the killing blow to this boss, make sure that you get one that has a lot of HP. if you end up killing one on the last hit, it'll still respawn inside the boss room even after the rest all died
- Anonymous
- Anonymous
me when i summon the cosmos in a few seconds and get called a failure
- Anonymous
Am I the only one who thinks they only have ONE of the Nightmare Yeti’s movesets (that being the slam)? I mean, the Living Failures look like the blue version of the yetis you find in the nightmare areas.
- Anonymous
All three heir runes and visceral attacks twice resulting in its death will get you several hundred millions of blood echoes
- Anonymous
Probably the best crowd boss but thats not really saying much
- Anonymous
- Anonymous
I died to the living failures more then any of the other dlc bosses
- Anonymous
Wow, it's surprising that From Soft put DSP in the game even after all his whining about the series !
They said I could be anything, so I became
a ✨disappointment✨
- Anonymous
Holy **** I’m in the game.
( I know the joke has been done before)
- Anonymous
I killed the person in front of the boss room so I can enter the fog gate faster
Now I only have to press X one time instead of three (2 times to end the dialogue and one time to go through the gate)
- Anonymous
Very cool attacks and a ****ing banger of a theme, but holy **** is the fight bad
- Anonymous
Literally one of the best OST songs for soulsborne and has one of the coolest looking attacks but so lame and such a long fight. at least they make up for their slowness by dishing out a shitload of damage with their attacks, should you ever get hit
- Anonymous
A pretty easy boss with an epic soundtrack with a badass meteor summoning attack. Seriously they literally summon a portal to mother****ing SPACE AND SUMMON METEORS THAT'S PRETTY COOL.
- Anonymous
- Anonymous
This boss was sooooo much easier solo than with Yamamura. His aggressive style helps keep the group occupied, but the extra health the boss gets coupled with the fact that Yamamura will knock the failures out of 3/4 of your visceral set ups makes it more trouble than it's worth. I burned 5 insight fighting with Yam and beat them on my first try solo with pretty much straight vicerals the whole time.
- Anonymous
This boss is terrible in NG+7, I've been playing w/ 17 vit in BL120 and this thing is harder than Ludwig, first time I ever rage in a fromsoftware game and I have played all of them with no shield, no items, no grinding, no invocations and no overpowered stuff. I truly feel like im doing everything right but getting destroyed because the game wants to, im probably just tired...
- Anonymous
Funniest Boss with the most Epic Music! I love the Stoneheads.
- Anonymous
why did you have to interrupt the alien meteor rave good hunter
- Anonymous
Tonitrus + 3 Dirty Gems (and possibly backed up by Tiny Tonitrus) makes this hilariously easy. Just so long as you spread out the damage between all of them and don't kill one. Otherwise you get Phase 2 Meteor'd in the face. OTOH, if you picked up Loch Shield, to hell with the Meteors.
- Anonymous
- Anonymous
Equip 3 "Heir" runes before the fight, and when the fight is about to end, kill 1 living failure with a visceral attack, and within 5 seconds or so FINISH the fight with another visceral attack on a different failure. You'll get ridiculously increased blood echoes.
- Anonymous
- Anonymous
Defeating these grants access to a lamp immediately before one of the best boss fights in the game. They may have failed in life but they were most certainly successful in death.
- Anonymous
- Anonymous
- Anonymous
- Anonymous
Is this boss considered Kin? If so, do Kinhunter gems help against him?
- Anonymous
Noo you can't summon meteors we created you to contact the gods- Haha cosmos go brr
- Anonymous
The clockwise comment is complete bull*****Just look where the meteors are coming from and then hide on the opposite side of the center pillar. They always come at a certain angle/direction
- Anonymous
"Lol that's me" This joke got stale the first 3000 times it was made. You're not funny.
- Anonymous
- Anonymous
I was fighting these guys and for some reason after the bosses' healthbar was depleted, and after the text that says "prey slaughtered" appeared, one of the failure guys was still alive and he even tried to summon the meteors by himself, I found it kinda funny.
- Anonymous
This boss is pathetic, easy AF asife from the stupid meteors that one shot me, WTF! Running counterclockwise like this guide says DOES NOT work. F*ck this boss....
- Anonymous
- Anonymous
- Anonymous
While arguably the most lackluster boss of the DLC, these bois do have one dubious "merit": they're an absolute PAIN on BL4. Between the rapid attacks, the endgame level damage and the large healthpool, you've got oneshots for days and a battle that will last way longer than it has any right to. Getting swarmed by 3 of these while you're trying to dodge the caster's ranged attacks is sure to make YOU feel like the living failure.
- Anonymous
if you kill the last two failures with viscerals within about 5 seconds of each other, the heir runes will stack with themselves 2^3 times (2 for each of 3 health bars depleted: 2 for the "mobs" and 1 for the boss). so if you have all 3 equipped you will get 3,100 times more echoes
- Anonymous
- Anonymous
- Anonymous
If you're having trouble with this fight because you aren't killing them fast enough, try using Beastblood Pellets.
- Anonymous
"Oh man, they're just like me..." Nah, you wish you deserved a boss health bar. You're more like a Winter Lantern -- so ugly that people's brains melt when they look at you.
- Anonymous
One of the easier boss fights in the game. Lots of fun though! Sharpens your position awareness and parrying skills. Love the visuals of the arena and the meteors.
- Anonymous
- Anonymous
That theme music would've seriously suited Orphan of Kos way better
- Anonymous
I used the Kirkhammer in hammer form and the old hunters bone with hit and run tactics. When it came to it's second phase, I hid in the doors with the loch shield equipped.
- Anonymous
To be honest, I actually found these guys harder than the Orphan, even with help summoned.
- Anonymous
- Anonymous
- Anonymous
moonlight greatsword did 90 damage transformed at +7. This sucks especially with me trying to do an Arcane only run :/
- Anonymous
You can also hide behind the tree during meteor shower and it gets blocked completely, weird it's not mentioned
- Anonymous
- Anonymous
- Anonymous
I never gave permission for From to use me in their game...
- Anonymous
- Anonymous
if you have the top tier moon and heir runes and an extra heir rune and kill this boss with a visceral, you will get a MASSIVE amount of echoes. im on ng+7 and i got over 5 million echoes by doing this. idk what causes it though
- Anonymous
To whomever just helped me kill these bastards, thank you very much!
- Anonymous
I don't know if it's a bug or intended, but when I did visceral attacks I recovered all the health I loss and gained 4 bullets instead of 2 (I was using Oedon Writhe and Blood Rapture)
- Anonymous
Okay but at 50 arcane with the choir set their spells still one shot me...wtf...


Literally me
2
+10
-1